


Set up a Custom RTMP in XSplit Broadcaster (Custom RTMP)
This guide shows you how to configure XSplit Broadcaster to stream to a RTMP/RTMPS server (CDN or private server) by entering the RTMP URL and Stream Key in a Custom RTMP output.

Figure 1 — Typical flow: encoder (XSplit) ? RTMP server ? viewers. Source: Amazon IVS (generic ingest diagram).
Table of contents
1) Requirements & needed details
For a Custom RTMP destination, you need these from your provider or your server:
- RTMP URL (or “Server URL”): e.g.
rtmp://host/apporrtmps://host/app - Stream Key (or “Stream Name/Key”, token): e.g.
channel1orchannel1?token=ABC123 - A stable upload connection (Ethernet is better than Wi?Fi)
Security note
Your Stream Key is like a password: anyone who has it can stream to your channel. Don’t share it.
Your Stream Key is like a password: anyone who has it can stream to your channel. Don’t share it.
Typical format
RTMP URL:    rtmp(s)://HOST[:PORT]/APP
Stream Key:  STREAM_NAME   (or STREAM_NAME?token=...)
2) Create a “Custom RTMP” output
- Open XSplit Broadcaster.
- Go to Broadcast ? Set up a new output ? Custom RTMP.

Figure 2 — Selecting Custom RTMP from the Broadcast menu. Source: XSplit Support.
Tip
Give the output a clear name (e.g. “Event CDN”, “Corporate RTMP Server”) so it’s easy to find under Broadcast.
Give the output a clear name (e.g. “Event CDN”, “Corporate RTMP Server”) so it’s easy to find under Broadcast.
3) Fill in RTMP URL and Stream Key
- In Custom RTMP Properties, fill in at least:
- Name (required)
- RTMP URL (Server URL)
- Stream Key
- If the provider requires credentials, use Specify channel credentials (only if required).
- Optional: use Test bandwidth for a quick estimate (if available).
- Click OK to save.
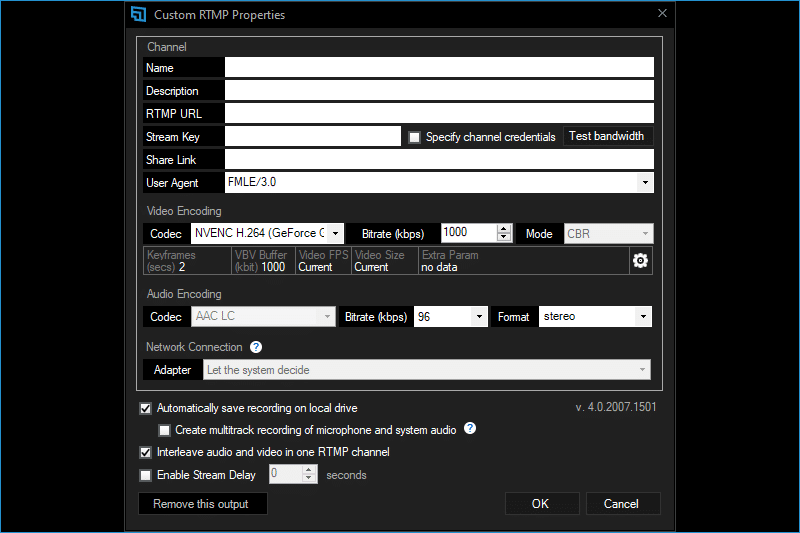
Figure 3 — Custom RTMP Properties: key fields and encoding options. Source: XSplit Support.
Field examples (Name / URL / Key)

Figure 4 — Name field (required). Source: XSplit Support.

Figure 5 — RTMP URL field. Source: XSplit Support.

Figure 6 — Stream Key field. Source: XSplit Support.
4) Recommended settings (video/audio)
Exact options vary by XSplit version and hardware, but as a safe baseline for most RTMP servers:
| Setting | Recommendation | Notes |
|---|---|---|
| Video codec | H.264 (x264 or NVENC H.264) | Most compatible for RTMP. |
| Rate control | CBR | Many services prefer it for stability. |
| Keyframes / keyframe interval | 2 seconds | Commonly required/recommended by CDNs. |
| Video bitrate | Based on upload (e.g. 3500–6000 kbps for 1080p30) | If you get dropped frames, lower bitrate or switch to 720p. |
| Audio codec | AAC-LC | Very widely supported. |
| Audio bitrate | 128–192 kbps | 160 kbps is a good balance. |
Upload rule of thumb
Keep total bitrate (video+audio) at most 60–70% of your real measured upload to avoid saturation and instability.
Keep total bitrate (video+audio) at most 60–70% of your real measured upload to avoid saturation and instability.
5) Start streaming and verify
- Open Broadcast and select the Custom RTMP output you created.
- If streaming starts correctly, you’ll see the selected output in the menu and/or live indicators.
- Verify on your provider dashboard/player that the stream is received.
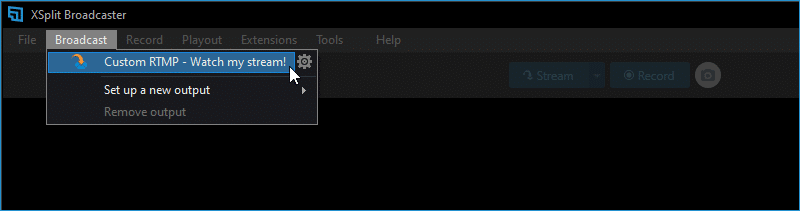
Figure 7 — Start: select the Custom RTMP output from the Broadcast menu. Source: XSplit Support.
6) Troubleshooting
Error: “Could not connect” / can’t connect
- Re-check RTMP URL and Stream Key (no extra spaces/characters).
- Verify the port: RTMP often uses TCP 1935. Some services use 80/443 or custom ports.
- Firewall/NAT: make sure outbound traffic isn’t blocked.
- If using RTMPS, ensure the endpoint supports RTMPS and the correct port is open.
Choppy stream / dropped frames
- Lower bitrate and/or resolution (720p is more resilient than 1080p).
- If CPU is maxed out, try NVENC (if available) or faster presets.
- Avoid Wi?Fi, stop competing uploads (cloud sync/backups).
Audio out of sync
- Keep a consistent sample rate (typically 48 kHz) and check delays on audio sources.
- Reduce heavy filters if the PC is under stress.
7) FAQ
Can I save multiple Custom RTMP destinations?
Yes: you can create multiple Custom RTMP outputs and select them from the Broadcast menu as needed.
RTMP vs RTMPS: what’s the difference?
RTMPS is RTMP over TLS: it encrypts the connection. If available, it’s preferred.
My provider gives me a single long “URL”: where do I put the key?
In many cases, the last part of the URL is the key/token. If XSplit requires separate fields, put the base endpoint in RTMP URL and the “key” part in Stream Key.


