


NewTek / Vizrt TriCaster: set up a Custom RTMP output

This guide shows how to configure a Custom RTMP on TriCaster to send your Program output to a platform or CDN that provides an RTMP URL and a Stream Key. Menu labels may vary slightly depending on the model (TC1, Mini, 410 Plus, Vizion, Vectar) and software version, but the overall workflow is the same.
1) Required details (RTMP URL + Stream Key)
From your provider/CDN (video platform, private CDN, etc.) gather:
- RTMP URL (sometimes called “Server”, “Ingest URL”, “Server Address”)
- Stream Key (sometimes called “Stream name”, “Stream ID”, “Key”)
- If required: username/password (not always used)
- If the port is not the default 1935: the specific port (e.g.
:443,:2935)
Server Address (TriCaster) = RTMP URL
Stream ID (TriCaster)      = Stream Key
Many services provide these values separately. If you’re given a single URL like rtmp://host/app/STREAMKEY, you typically paste everything before the last “/” into Server Address and the last part as Stream ID.

Your Stream Key is like a password: don’t share it and don’t paste it into public tickets.
2) Open Stream/Encode (Streaming Configuration)
- Open your TriCaster session (Live Production).
- Find the Stream/Encode button (usually on the dashboard/toolbar).
- Click the ?? (gear) icon next to Stream/Encode to open the streaming configuration.
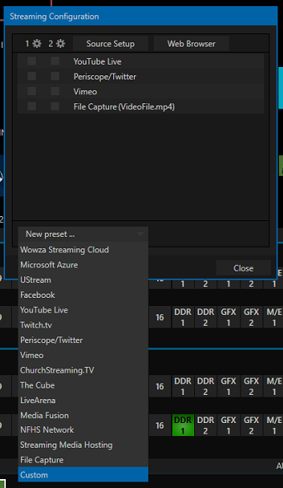
3) Create a “Custom” preset
- In Streaming Configuration, click New preset (or “New Preset”).
- Select Custom.
- Give the preset a name (e.g. CDN - Event or RTMP - Provider).
If you stream to multiple destinations (CDN + social, etc.), create a preset for each one so you can reuse settings and avoid mistakes.
4) Paste Server Address and Stream ID (key)
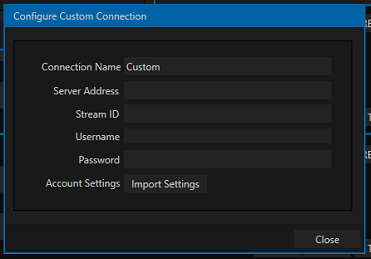
After choosing “Custom”, TriCaster opens the connection configuration window. This is where you enter the provider parameters.
4.1 Configure the connection
- Review/fill Connection Name (preset/connection label).
- Enter:
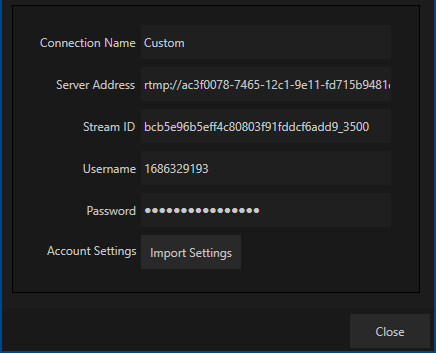
- Server Address = RTMP URL
- Stream ID = Stream Key
- Username/Password only if required by the provider
- Click Close to save and return to the session.
Some providers require RTMPS (RTMP over TLS). Support may depend on your TriCaster model/version and the preset/connection type. If RTMPS is required and the connection fails, consider:
- updating TriCaster to the latest available version
- using RTMP on an alternative port provided by the service (if available)
- or using an external encoder that supports RTMPS
5) Start streaming
- Return to the main TriCaster interface (Live Production).
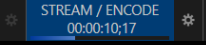
- Press Stream/Encode to start streaming.
- Check the status: a timer/indicator should start (often the control highlights).
- Verify in your provider dashboard that the stream is online and stable.
6) Recommended settings (compatibility)
Exact settings depend on your platform/CDN. A highly compatible RTMP ingest baseline:
| Parameter | Recommendation | Notes |
|---|---|---|
| Video codec | H.264 | Most compatible for RTMP. |
| Resolution / FPS | 1080p30 or 720p30 | If your network is unstable, 720p is more resilient. |
| Video bitrate | 3–6 Mbps (indicative) | Adjust to your real upload (see note below). |
| Keyframe / GOP | 2 seconds | Commonly required/recommended by CDNs. |
| Audio | AAC 128–192 kbps @ 48 kHz | 160 kbps is a good balance. |
| Rate control | CBR when possible | Improves ingest/player stability. |
Keep total bitrate (video + audio) within 60–70% of real measured upload to avoid saturation and buffering.
7) Troubleshooting
Won’t connect / publish error
- Double-check Server Address and Stream ID (no extra spaces).
- Make sure the URL includes the correct path/app (e.g.
/live). - If the port is not 1935, confirm it’s included in the URL (e.g.
:443,:2935). - If credentials are required, fill in Username/Password (only if provided by the service).
Choppy stream / buffering
- Lower bitrate or switch to 720p30.
- Avoid competing uploads on the same network.
- Prefer Ethernet and a stable connection.
Nothing shows on the provider side
- Confirm Stream/Encode is actually running (timer running).
- Some platforms show preview with a slight delay: wait and refresh.
- Check stream status is “Online/On” in the provider dashboard.
8) FAQ
Can I save settings for reuse?
Yes: “Custom” presets remain available, and you can create multiple presets for different destinations.
RTMP or RTMPS?
RTMPS encrypts traffic. If your platform requires it, confirm your TriCaster version supports it or use an external encoder that does.
References: Vizrt — TriCaster Family • Dacast — TriCaster Streaming (RTMP) • Restream — Connect TriCaster (Custom RTMP)


